Tiny Game Engine !? LittleJS を試してみる。
こんにちは k-jun です。今回は、極小のゲームエンジンライブラリ LittleJS を試してみます。
https://github.com/KilledByAPixel/LittleJS
README.md を見る限りでは、結構自由度が高そうです。2D に限定されているとはいえ、めちゃくちゃ重いはずの Game Engine が軽めに使用できそうでワクワクです。
Setup
github に全てのファイルが収まってるってすごいですよね。一旦 examples のディレクトリに格納されているゲームを遊んでみます。
$ git clone https://github.com/KilledByAPixel/LittleJS.git
$ LittleJS
$ python -m http.server 7777
http://localhost:7777 にアクセスしてみると、何やらパズルゲームが出迎えてくれます。

http://localhost:7777/examples/ に階層を降りると、ゲームディレクトリが並んでいます。一通り見てみる。

breakout

platformer

puzzle

stress
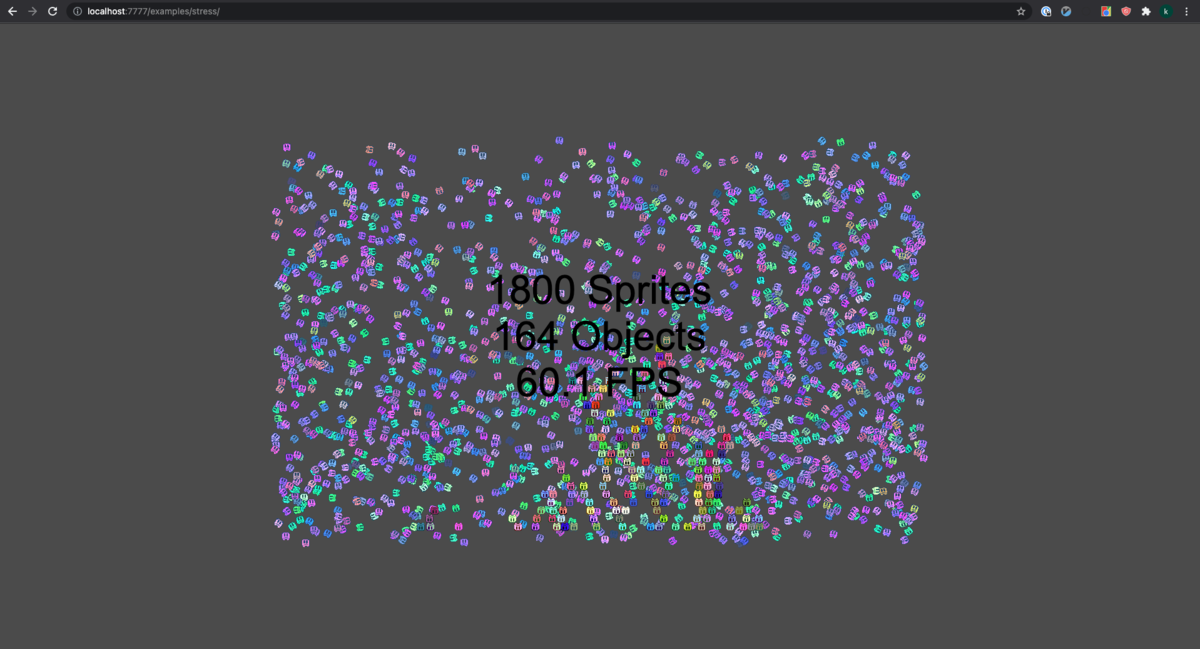
すごすぎ。特に platformer なんてどうやったらコレがあんなに小さいファイルたちで作れるのかわからないぐらいに完成度が高い。どうなってるんだ。
platformer の中身を見てみます。index.html の中身はこれだけ。
<html><head><title>LittleJS Platformer Example</title>
<meta name=viewport content=width=device-width,initial-scale=1,maximum-scale=1>
<link rel=icon type=image/png href=../../favicon.png>
</head><body>

<script src=../../engine/engine.all.js?53></script>
<script src=gameObjects.js?53></script>
<script src=gamePlayer.js?53></script>
<script src=gameEffects.js?53></script>
<script src=gameLevel.js?53></script>
<script src=game.js?53></script>
各種ファイルにそれぞれの設定が記述されているようです。驚くことにどのファイルも 400 行以下で記述されています。すごいなぁ。 精査してみていくと、どのゲームも以下のような構成で記述されているようです。gameUpdate() が 1秒間に 60 回程度実行され、ゲームを rendering しているようです。
/*
    LittleJS Hello World Starter Game
*/
'use strict';

///////////////////////////////////////////////////////////////////////////////
function gameInit()
{
}

///////////////////////////////////////////////////////////////////////////////
function gameUpdate()
{
}

///////////////////////////////////////////////////////////////////////////////
function gameUpdatePost()
{

}

///////////////////////////////////////////////////////////////////////////////
function gameRender()
{
}

///////////////////////////////////////////////////////////////////////////////
function gameRenderPost()
{
}

///////////////////////////////////////////////////////////////////////////////
// Startup LittleJS Engine
engineInit(gameInit, gameUpdate, gameUpdatePost, gameRender, gameRenderPost, 'tiles.png');
何か面白いものを作れればと思いましたが、僕の拙いゲーム力と、フロント力では何も生み出せませんでした...。 Unity などに詳しい方お願いします。それでは今回はこの辺で。
Docker 代替ツール podman を試してみた。
こんにちは k-jun です。今回は、Docker のような Container ツール podman を試してみようと思います。
https://github.com/containers/podman
Docker はかなり硬い地位を気づいているので、Container ツールとしての覇権は譲らないと思いこんでいました。が、podman もそれなりに名前を聞くようになってきたのでびっくりです。 どうでもいいですが、Kubernetes の Pod とはあまり関係がないらしいですね。
Setup
インストールはここに従います。インストール後には、podman machine init で podman の API を起動させていきます。
$ brew install podman
$ podman machine init
$ podman machine start
INFO[0000] waiting for clients...
INFO[0000] listening tcp://0.0.0.0:7777
INFO[0000] new connection from  to /var/folders/3b/7chj8jgx5z5g0cdh0szfv1b40000gn/T/podman/qemu_podman-machine-default.sock
Waiting for VM ...
 $ podman info | head
host:
  arch: amd64
  buildahVersion: 1.23.1
  cgroupControllers: []
  cgroupManager: systemd
  cgroupVersion: v2
  conmon:
    package: conmon-2.0.30-2.fc34.x86_64
    path: /usr/bin/conmon
    version: 'conmon version 2.0.30, commit: '
良さそうですね。
Run
getting-startedに従っていきます。search コマンドで nginx の image を検索した後に、pull してみます。
$ podman search nginx | head
INDEX       NAME                                       DESCRIPTION                                      STARS       OFFICIAL    AUTOMATED
docker.io   docker.io/library/nginx                    Official build of Nginx.                         15727       [OK]
docker.io   docker.io/jwilder/nginx-proxy              Automated Nginx reverse proxy for docker con...  2088                    [OK]
docker.io   docker.io/nginxinc/nginx-unprivileged      Unprivileged NGINX Dockerfiles                   54
docker.io   docker.io/nginx/nginx-ingress              NGINX and  NGINX Plus Ingress Controllers fo...  55
docker.io   docker.io/richarvey/nginx-php-fpm          Container running Nginx + PHP-FPM capable of...  818                     [OK]
docker.io   docker.io/privatebin/nginx-fpm-alpine      PrivateBin running on an Nginx, php-fpm & Al...  59                      [OK]
docker.io   docker.io/nginx/nginx-prometheus-exporter  NGINX Prometheus Exporter for NGINX and NGIN...  21
docker.io   docker.io/nginxdemos/hello                 NGINX webserver that serves a simple page co...  76                      [OK]
docker.io   docker.io/mailu/nginx                      Mailu nginx frontend                             9                       [OK]

$ podman pull nginx
Resolving "nginx" using unqualified-search registries (/etc/containers/registries.conf.d/999-podman-machine.conf)
Trying to pull docker.io/library/nginx:latest...
$ podman images
REPOSITORY               TAG         IMAGE ID      CREATED      SIZE
docker.io/library/nginx  latest      87a94228f133  2 weeks ago  138 MB
Docker と互換性があるはずなので、images も打ってみましたが大丈夫そうですね ! いよいよ起動させていきます。
$ podman run -dt -p 8080:80/tcp nignx
$ curl -s http://localhost:8080 | head
<!DOCTYPE html>
<html>
<head>
<title>Welcome to nginx!</title>
<style>
html { color-scheme: light dark; }
body { width: 35em; margin: 0 auto;
font-family: Tahoma, Verdana, Arial, sans-serif; }
</style>
</head>
実際に、起動していますね ! ということで、Docker コマンドのような扱いはできそうです。
Diff
見かけ上は Docker と podman はほとんど変わっていないように見えていますが、内部的には結構違うようです。
https://www.redhat.com/ja/blog/working-linux-containers-rhel-8-podman-image-builder-and-web-console
Podman was released with Red Hat Enterprise Linux 7.6 and 8.0 as the next generation of Linux container tools, is designed to allow faster experimentation and development of features.
Red Hat の v7.6 あたりで新しい container tool として開発されたようですね。OCI と呼ばれる Docker とは違った仕様に従っているようです。 内部的な仕様などかなり詳細に説明してくれていますが、ここでは Docker とは異なった別の仕組みで動いている。程度にとどめておきます。
Docker コマンドはそのまま podman に置き換えても動きそうなので、自由に変更できるプロダクトなどでは使ってみようと思います。 docker-compose も podman に plugin を導入することで扱えるようになるようですね! 面白そうです! それでは今日はこのへんで。
Reference
タイポを検出して指摘してくれる typos を試してみた。
こんにちは k-jun です。今回は、rust 製のタイポ検出ツール typos を試してみます。
https://github.com/crate-ci/typos
結構あるあるなんですよね。コードを書いていて、最初に変数を定義した人間がtypo をしており、あとに編集を加える人間はそれを根本から修正するのか typo に甘んじるのか悩むという... そんな状況が改善できると良いですよね...
Install
$ cargo install typos-cli
Run
手元のメモを溜め込んでいる repository が存在するので、そちらに実行してみます。
$ typos
error: `laod` should be `load`
  --> ./book/実践ハイパフォ−マンスMySQL/2-MySQLのベンチマーク/2.4-ベンチマークツール.md:8:7
  |
8 | * http_laod
  |        ^^^^
  |
error: `assing` should be `assign`
  --> ./book/Nginx実践入門/9-Luaによるnginxの拡張.md:149:15
    |
149 | ngx.va.uri = "/assing"
    |                ^^^^^^
    |
error: `calue` should be `value`
  --> ./book/Nginx実践入門/7-大規模コンテンツ配信サーバーの構築.md:68:68
   |
68 |     proxsy_cache_path /var/lib/nginx/cache/nginx levels=1 keys_zone=calue:4M inactive=1d max_size=100M;
   |                                                                     ^^^^^
   |
error: `UNCOMMITED` should be `UNCOMMITTED`
  --> ./book/実践ハイパフォ−マンスMySQL/1-MySQLのアーキテクチャと歴史/1.3-トランザクション.md:23:7
   |
23 | * READ UNCOMMITED
   |        ^^^^^^^^^^
   |
error: `CAHR` should be `CHAR`
  --> ./book/実践ハイパフォ−マンスMySQL/4-スキーマとデータ型の最適化/4.1-最適なデータ型の選択.md:54:22
...
ぐはぁ.... 大量に出てきました.... 辛い。どうやら自動修正もしてくれるようなので、実行してみます。
typos --write-changes
20 程度のファイルの typo が全部治りました...。ci として組み込んでおけば大量の typo を防止できそうです...。特に我々のような非ネイティブは typo に気づきにくいですからね。 こういうふうな自動検知は非常に大切です。それでは今回はこのへんで。
メーリングリスト管理ツール linkmonk を試してみる。
こんにちは k-jun です。今回はメーリングリストを管理するツール listmonk を試してみます。
https://github.com/knadh/listmonk
軽く見た感じは SendGrid みたいなことが出来るといいなぁと思っています。
Deploy
'Deploy to Heroku' ボタンがあったのでここから Heroku にデプロイしてみます。このボタン実は使ったことなかったんですよね。 Basic 認証の ユーザーとパスワードを設定して、デプロイ後に覗いてみます。

シンプルなデザインには見えますが、良さそうですね。あとは何が出来るのか。ひとまず、メールアドレスの追加は流石にできそうです。

あとは、キャンペーンと呼ばれるものを作成すると、管理されているメールのリストに対してメールが飛ぶようですね。 メール送信のスケジューリングもできるようです。
メールの編集画面はそれなりにちゃんとしていました。

キャンペーンをスタートしてメールを送信してみるも届かない...。なんでだろうと思っていると smtp サーバーを設定する必要があることに気づきました笑。

google の smtp サーバーを利用して設定を行ったところ、正常にメールが送信されましたね。実際に利用する際には google のものは API 上限などもありそうなので避けたほうが良さそうですが。 Docker なども用意されているので、Deploy までたどり着くのは簡単そう。となると、API がほしいですね。
https://listmonk.app/docs/apis/lists/
Document もありました。Basic 認証なのが気になるところですが、まあ listmonk を使用する程度の規模であれば許容するで良い気もします。 サクッと試せて面白かったです。それでは今回はこのへんで。
Docker オーケストレーションツール Nomad を使ってみる。
こんにちは k-jun です。今回は docker や podman などの container や Virtual Machine などのリソースを動的にスケールさせるオーケストレーションツール Nomad を使ってみようと思います。
https://github.com/hashicorp/nomad
立ち位置としては Kubernetes のようになるんでしょうか。Terraform と連携できたり、GUI もあるようなのでワクワクです。以下のリンクに従って構築してみます。
https://learn.hashicorp.com/collections/nomad/get-started
Install
https://learn.hashicorp.com/tutorials/nomad/get-started-install?in=nomad/get-started
$ brew tap hashicorp/tap
$ brew install hashicorp/tap/nomad
$ which nomad
/usr/local/bin/nomad
大丈夫そう。Cluster を起動してみます。
$ sudo nomad agent -dev -bind 0.0.0.0 -log-level INFO
==> No configuration files loaded
==> Starting Nomad agent...
==> Nomad agent configuration:

       Advertise Addrs: HTTP: 172.31.96.6:4646; RPC: 172.31.96.6:4647; Serf: 172.31.96.6:4648
            Bind Addrs: HTTP: 0.0.0.0:4646; RPC: 0.0.0.0:4647; Serf: 0.0.0.0:4648
                Client: true
             Log Level: INFO
                Region: global (DC: dc1)
                Server: true
               Version: 1.1.5

==> Nomad agent started! Log data will stream in below:

    2021-10-06T04:32:32.842+0900 [INFO]  agent: detected plugin: name=exec type=driver plugin_version=0.1.0
    2021-10-06T04:32:32.842+0900 [INFO]  agent: detected plugin: name=qemu type=driver plugin_version=0.1.0
    2021-10-06T04:32:32.842+0900 [INFO]  agent: detected plugin: name=java type=driver plugin_version=0.1.0
...
これも行けてそう。何かが起動したようです。別 Terminal から Node の状態を見てみます。
$ nomad node status
ID        DC   Name         Class   Drain  Eligibility  Status
bc09b3da  dc1  O-14731-MAC  <none>  false  eligible     ready

$ nomad server members
Name                Address      Port  Status  Leader  Protocol  Build  Datacenter  Region
O-14731-MAC.global  172.31.96.6  4648  alive   true    2         1.1.5  dc1         global
イマイチわからんが、Status が ready や alive だし大丈夫そう。この Cluster に対して job と呼ばれる単位のコンポーネントを定義し、与えていきます。
テンプレートを生成。
$ nomad job init
Example job file written to example.nomad
生成されたファイルのコメントを全て削除すると以下のような内容になっています。コメントを一通り読めばそれぞれのパラメーターの設定値は理解できますが、僕はせっかちなのでひとまず先に進みます。
パット見は redis が docker で起動して、port: 6379 で待ち構えるようになりそうですね。
job "example" {
  datacenters = ["dc1"]
  type = "service"
  update {
    max_parallel = 1
    min_healthy_time = "10s"
    healthy_deadline = "3m"
    progress_deadline = "10m"
    auto_revert = false
    canary = 0
  }
  migrate {
    max_parallel = 1
    health_check = "checks"
    min_healthy_time = "10s"
    healthy_deadline = "5m"
  }
  group "cache" {
    count = 1
    network {
      port "db" {
        to = 6379
      }
    }
    service {
      name = "redis-cache"
      tags = ["global", "cache"]
      port = "db"
    }

    restart {
      attempts = 2
      interval = "30m"
      delay = "15s"
      mode = "fail"
    }
    ephemeral_disk {
      size = 300
    }
    task "redis" {
      driver = "docker"
      config {
        image = "redis:3.2"
        ports = ["db"]
      }
      resources {
      }
    }
  }
}
job を実行して走らせてみます。
$ nomad job run example.nomad
==> 2021-10-06T04:44:14+09:00: Monitoring evaluation "9a75cb51"
    2021-10-06T04:44:14+09:00: Evaluation triggered by job "example"
==> 2021-10-06T04:44:15+09:00: Monitoring evaluation "9a75cb51"
    2021-10-06T04:44:15+09:00: Evaluation within deployment: "00e4f022"
    2021-10-06T04:44:15+09:00: Allocation "4f77c19b" created: node "bc09b3da", group "cache"
    2021-10-06T04:44:15+09:00: Evaluation status changed: "pending" -> "complete"
==> 2021-10-06T04:44:15+09:00: Evaluation "9a75cb51" finished with status "complete"
==> 2021-10-06T04:44:15+09:00: Monitoring deployment "00e4f022"
  ✓ Deployment "00e4f022" successful

    2021-10-06T04:44:36+09:00
    ID          = 00e4f022
    Job ID      = example
    Job Version = 0
    Status      = successful
    Description = Deployment completed successfully

    Deployed
    Task Group  Desired  Placed  Healthy  Unhealthy  Progress Deadline
    cache       1        1       1        0          2021-10-06T04:54:35+09:00
何やら動き出しましたね。ちなみに何度やっても同じ実行結果なので、冪等性がありそうです。Job の状態を見てみます。
$ nomad job status example
ID            = example
Name          = example
Submit Date   = 2021-10-06T04:44:14+09:00
Type          = service
Priority      = 50
Datacenters   = dc1
Namespace     = default
Status        = running
Periodic      = false
Parameterized = false

Summary
Task Group  Queued  Starting  Running  Failed  Complete  Lost
cache       0       0         1        0       0         0

Latest Deployment
ID          = 00e4f022
Status      = successful
Description = Deployment completed successfully

Deployed
Task Group  Desired  Placed  Healthy  Unhealthy  Progress Deadline
cache       1        1       1        0          2021-10-06T04:54:35+09:00

Allocations
ID        Node ID   Task Group  Version  Desired  Status   Created    Modified
4f77c19b  bc09b3da  cache       0        run      running  2m48s ago  2m27s ago
Allocation という項目がこの Job がどの Node で実行されているのかを示しているようです。これも状態を見るコマンドが存在するようなので見ていきます。
$ nomad alloc status 4f77c19b
ID                  = 4f77c19b-e49a-56d3-c5cd-764bd84c63a0
Eval ID             = 9a75cb51
Name                = example.cache[0]
Node ID             = bc09b3da
Node Name           = O-14731-MAC
Job ID              = example
Job Version         = 0
Client Status       = running
Client Description  = Tasks are running
Desired Status      = run
Desired Description = <none>
Created             = 4m48s ago
Modified            = 4m27s ago
Deployment ID       = 00e4f022
Deployment Health   = healthy

Allocation Addresses
Label  Dynamic  Address
*db    yes      127.0.0.1:31671 -> 6379

Task "redis" is "running"
Task Resources
CPU         Memory           Disk     Addresses
20/100 MHz  960 KiB/300 MiB  300 MiB

Task Events:
Started At     = 2021-10-05T19:44:25Z
Finished At    = N/A
Total Restarts = 0
Last Restart   = N/A

Recent Events:
Time                       Type        Description
2021-10-06T04:44:25+09:00  Started     Task started by client
2021-10-06T04:44:14+09:00  Driver      Downloading image
2021-10-06T04:44:14+09:00  Task Setup  Building Task Directory
2021-10-06T04:44:14+09:00  Received    Task received by client
おお、Port Forward っぽいものが見えましたね。一応 telnet で観測してみます。
$ telnet 127.0.0.1 31671
Trying 127.0.0.1...
Connected to localhost.
Job ごとの Log を観測するには以下のようなコマンドを使用します。
$ nomad alloc logs 4f77c19b
1:C 05 Oct 19:44:25.047 # Warning: no config file specified, using the default config. In order to specify a config file use redis-server /path/to/redis.conf
                _._
           _.-``__ ''-._
      _.-``    `.  `_.  ''-._           Redis 3.2.12 (00000000/0) 64 bit
  .-`` .-```.  ```\/    _.,_ ''-._
 (    '      ,       .-`  | `,    )     Running in standalone mode
 |`-._`-...-` __...-.``-._|'` _.-'|     Port: 6379
 |    `-._   `._    /     _.-'    |     PID: 1
  `-._    `-._  `-./  _.-'    _.-'
 |`-._`-._    `-.__.-'    _.-'_.-'|
 |    `-._`-._        _.-'_.-'    |           http://redis.io
  `-._    `-._`-.__.-'_.-'    _.-'
 |`-._`-._    `-.__.-'    _.-'_.-'|
 |    `-._`-._        _.-'_.-'    |
  `-._    `-._`-.__.-'_.-'    _.-'
      `-._    `-.__.-'    _.-'
          `-._        _.-'
              `-.__.-'

1:M 05 Oct 19:44:25.048 # WARNING: The TCP backlog setting of 511 cannot be enforced because /proc/sys/net/core/somaxconn is set to the lower value of 128.
1:M 05 Oct 19:44:25.048 # Server started, Redis version 3.2.12
1:M 05 Oct 19:44:25.048 # WARNING you have Transparent Huge Pages (THP) support enabled in your kernel. This will create latency and memory usage issues with Redis. To fix this issue run the command 'echo never > /sys/kernel/mm/transparent_hugepage/enabled' as root, and add it to your /etc/rc.local in order to retain the setting after a reboot. Redis must be restarted after THP is disabled.
1:M 05 Oct 19:44:25.048 * The server is now ready to accept connections on port 6379
いい感じですね。Kubernetes と同様に Container の起動、log の収集、Port Fowarding と同等のことが観測できています。Job の更新も試してみます。
$ cat example.nomad | grep count
    count = 3
$ nomad job plan example.nomad
+/- Job: "example"
+/- Task Group: "cache" (2 create, 1 in-place update)
  +/- Count: "1" => "3" (forces create)
      Task: "redis"

Scheduler dry-run:
- All tasks successfully allocated.

$ nomad job run example.nomad
$ nomad job status example
...
Allocations
ID        Node ID   Task Group  Version  Desired  Status   Created     Modified
9d06b72d  bc09b3da  cache       1        run      running  41s ago     30s ago
d05b931b  bc09b3da  cache       1        run      running  41s ago     29s ago
4f77c19b  bc09b3da  cache       1        run      running  14m56s ago  30s ago
Terraform チックな Dry-run も試せるようです。なかなか良さげですね。適用した結果も Allocations の箇所に ID が追加されているのできちんと起動してそうです。 Local PC 上で試しているので、Node ID が単一のものですが、Cluster を VM 上で構成すると、ここもいい感じに分散してくれそうです。
なお run command 実行時に、-check-index のパラメーターを付与することで 変更前の状態が plan command 実行時と変わらないことを確認してくれるようです。
これにより、複数人で作業しており plan command から run command を実行する間に他の作業者の run command が挟まっていないことを保証してくれるようです。
次に web interface を確認してみます。 localhost:4646/ui/jobs から確認。

この UI はすごいですね... 一発で状態把握ができそうです。
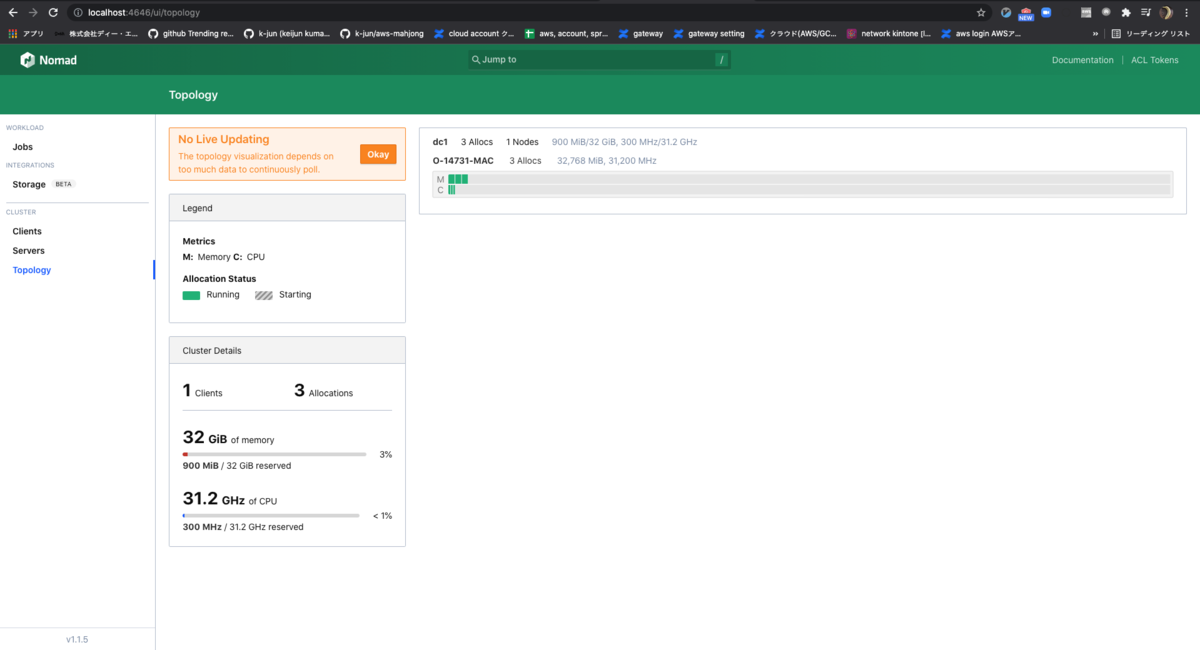
詳細設定なども見てみると、使用できる Memory 量などは Docker の設定を参照しているようですね。それにしてもこの UI は凄い。 Kubernetes はあまり詳しくないのですが、同等の UI を提供できるプラグインなどは存在するのでしょうか。
他の画面は以下のページを参照すると大体の雰囲気がつかめると思います。結構未来を感じますね...。
https://learn.hashicorp.com/tutorials/nomad/get-started-ui?in=nomad/get-started
それでは今回はこのへんで!
Google Analytics の代替ツール umami を試してみる。
こんにちは k-jun です。今回は Google Analytics の代替品 umami を試してみます。
https://github.com/mikecao/umami
普通に自分が日本人なのでバイアスが掛かっているだけだと思いますが、日本語の単語をもとにしたプロダクト名が結構あるように感じています。 umami だの youki だの tokei だの。なんかアルファベットになっているのでかっこよく見えますけどね !!
Install
ここ に従うだけで大丈夫そう。 npm install とは何とも原始的な。。。OSS みを感じますね。自分で全部やって的な。
git clone https://github.com/mikecao/umami.git
cd umami
npm install
あとは MySQL と .env を編集していきます。PostgreSQL でも行けるみたいです。
$ docker run -p 3306:3306 -e MYSQL_ROOT_PASSWORD=root -e MYSQL_USER=test -e MYSQL_PASSWORD=test -e MYSQL_DATABASE=test -d mysql:5.7
$ mysql -uroot -proot -h127.0.0.1 -Dtest < sql/schema.mysql.sql
$ echo "DATABASE_URL=mysql://root:root@127.0.0.1:3306/test\nHASH_SALT=B3F1BFB6-32D3-47C9-8709-D2D57C727293" > .env
Run
起動してみます。
$ npm run build
$ npm run start

初期ログイン情報を打ち込んでログインするといい感じのダッシュボードが。良さそうですね。

ではでは実際に Javascript を使用してトラッキングさせてみます。以前 markdown から静的サイトを生成する zola を試した際に 作ったブログを使ってみます。
の中に以下のようなスクリプトを埋め込めば良いようですね。<script async defer data-website-id="cdf529d2-5e58-4868-bfca-0beb02879481" src="http://localhost:3000/umami.js"></script>

リアルタイムに反映されるの結構すごいですね。Hackathon などで簡易的なトラッキングサービスで問題ないのであれば、たしかに問題なさそうです。 何よりサクッと出来るのが良いですね。Google Analytics を実は使ったことがないので後で使って比べてみます。それでは今回はこのへんで。
開発環境を https 化する mkcert を試してみる。
こんにちは k-jun です。今回は手軽に SSL 証明書を発行できる cli ツール mkcert を試してみます。
https://github.com/FiloSottile/mkcert
開発環境の https 化を目指したものなので、オレオレ証明書の自動作成ツールとはなりませんが。
Install
$ brew install mkcert
Run
$ mkcert filippo@example.com
Note: the local CA is not installed in the system trust store.
Run "mkcert -install" for certificates to be trusted automatically ⚠️

Created a new certificate valid for the following names 📜
 - "filippo@example.com"

The certificate is at "./filippo@example.com.pem" and the key at "./filippo@example.com-key.pem" ✅

It will expire on 2 January 2024 🗓
$ ls filippo@example.com*
filippo@example.com-key.pem     filippo@example.com.pem
S/MIME certificate なんてものもあるんですね。初めて知りました...。
適当に証明書を作ってみます。ドメインは localhostで。
$ mkcert localhost
Note: the local CA is not installed in the system trust store.
Run "mkcert -install" for certificates to be trusted automatically ⚠️

Created a new certificate valid for the following names 📜
 - "localhost"

The certificate is at "./localhost.pem" and the key at "./localhost-key.pem" ✅

It will expire on 4 January 2024 🗓
localhost.pem と localhost-key.pem が生成されました。これを用いて SSL の設定をしていきます。Docker で Nginx を起動し、これに設定ができれば大丈夫と思いますのでこれでやっていきます。
# nginx.conf
http {
  server_names_hash_bucket_size 128; # this seems to be required for some vhosts

  server { # simple reverse-proxy

    listen 443;
    ssl on;
    ssl_certificate /tmp/localhost.pem;
    ssl_certificate_key /tmp/localhost-key.pem;

    location / {
      # proxy_pass http://host.docker.internal:5000;
      return 200 "Hello World";
    }
  }
}[f:id:K-jun1221:20211004012754p:plain]
# docker-compose.yml
version: "3.3"
services:
  nginx:
    ports:
      # - "8080:80"
      - "8443:443"
    image: nginx
    volumes:
      - ./nginx.conf:/etc/nginx/nginx.conf
      - /tmp:/tmp
大丈夫そう。それでは起動します。
$ docker-compose up
Starting nginx_nginx_1 ... done
Attaching to nginx_nginx_1
nginx_1  | /docker-entrypoint.sh: /docker-entrypoint.d/ is not empty, will attempt to perform configuration
nginx_1  | /docker-entrypoint.sh: Looking for shell scripts in /docker-entrypoint.d/
nginx_1  | /docker-entrypoint.sh: Launching /docker-entrypoint.d/10-listen-on-ipv6-by-default.sh
nginx_1  | 10-listen-on-ipv6-by-default.sh: error: IPv6 listen already enabled
nginx_1  | /docker-entrypoint.sh: Launching /docker-entrypoint.d/20-envsubst-on-templates.sh
nginx_1  | /docker-entrypoint.sh: Configuration complete; ready for start up
nginx_1  | 2021/10/03 16:28:30 [warn] 1#1: the "ssl" directive is deprecated, use the "listen ... ssl" directive instead in /etc/nginx/nginx.conf:30
nginx_1  | nginx: [warn] the "ssl" directive is deprecated, use the "listen ... ssl" directive instead in /etc/nginx/nginx.conf:30
Chrome からアクセスしてみる。
[
大丈夫そうですね! 開発環境の https は mkcert で簡単に実現できそうです。正直最初はオレオレ証明書簡単生成ツールとして見ていましたが、開発環境限定でした...。 まあ、オレオレ証明書ぐらい自分で生成しろって話ですね。それでは今回はこのへんで。